Friday, October 11, 2013

Disable Wireless when a Wired connection is detected - BIOS setting


Disable Wireless when a Wired connection is detected - BIOS setting

This step details best practice methods for disabling the wireless radio on a wireless connection only when a wired connection is active. This is a BIOS setting, as such it is dependent on your workstation's BIOS allowing you to do this!
DELL Latitude Model E6420 and above (not available on 6410 and below!) 
a) Enter BIOS settings by pressing F2 on boot-up (On the Dell splash screen). 
b) Expand Power Management on the left and select, "Wireless Radio Control". 
c) Put a check mark in "Control WLAN Radio" and hit Enter.

Also see:
 http://agsci.psu.edu/it/how-to/enable-disable-an-enterprise-laptops-wifi
 

Enable / Disable an Enterprise Laptop's Wi-Fi

Wi-Fi, short for Wireless Fidelity, is networking technology that allows you to connect to the Internet. If you have a wireless-enabled Latitude computer you can connect to the Internet when in range of an access point called a hotspot.
When not in use your Latitude's wireless card should be disabled. By disabling Wi-Fi, you will receive two benefits:
  1. Start-up times will be much faster.
    If the wireless card is ON and you are out of the office (not connected to your normal, wired connection), the laptop will try to use the Wi-Fi network during the login process to run the various start-up scripts, etc. It will eventually time-out (fail). By having the wireless card turned OFF, the start-up process will be much faster.
  2. Computer will not continually search for a wireless network (and waste battery life).
    If you are in the office (connected to your normal, wired connection) or in a location where there is no wireless hotspot, you don't need to have the computer waste processing power by looking and looking for a wireless hotspot. By disabling Wi-Fi, you will gain a little more power for your other tasks. In addition, you will maximize your battery operating time by disabling wireless activity.

    NOTE: After your Latitude has started up completely, you can ENABLE the wireless card and connect to a wireless hotspot. For example, a wireless router at your home or at a local coffee shop. If you have connected to this hotspot previously, the wireless card should connect automatically for you.

    NOTE: Once you have the wireless card enabled, before you shut down the computer, you should again DISABLE the card. The computer will then be ready for the next time you turn it on with wireless turned off.

Enable / Disable with Hardware Switch

The more recent Latitude models have a wireless switch to enable or disable wireless network devices and the
Wi-Fi Catcher Network Locator.
Dell Latitude E6420 and E6520 Series
These laptops have a small switch on the RIGHT side of the keyboard. The switch is toward the front of the laptop. The Wi-Fi Catcher™ icon will is above  the keyboard. You will see a lit radio tower if the wireless switch is enabled.


E6520_WiFi_Switch

Dell Latitude E-Series
These laptops have a small switch on the RIGHT side of the keyboard. The switch is toward the back of the laptop. The Wi-Fi Catcher™ icon will be on the switch.
"off" position - Disables wireless device
In an improvement over the earlier models, when the switch is in the "off" position, you see an orange panel next to the switch.
 D6410 Wireless Off
"on" position - Enables wireless device
D6410 Wireless On

Dell Latitude D820 or D830These laptops have a small switch on the LEFT side of the keyboard.
D820-D830 wireless switch
1 - "off" position - Disables wireless device
2 - 'on" position - Enables wireless device
3 - "momentary" position - Scans for Wi-Fi networks
4- Wi-Fi Catcher™ light
  • Flashing green: Searching for networks
  • Solid green: Strong network found
  • Solid yellow: Weak network found
  • Flashing yellow: Error
  • Off: No signal found

Enable / Disable with Software (via Control Panel)

Older models without the switch, or newer models as well, can turn off (disable) or turn on (enable) the wireless card via the Windows Control Panel. These steps will focus on disabling the wireless card. See the "NOTE" for enabling the card again.
Windows XP
  1. Click Start and choose Control Panel. Double click on Network Connections icon.
  2. Look for the Wireless Network Connection icon. When you see it, Right Click on the Wireless Network Connection icon.
  3. If you see an Enable choice, the Wi-Fi is already disabled. You're good to go. Close the Network Connections window.

    If you see a Disable choice, select it. This will disable the wireless card. Close the Network Connections window.

    NOTE: When you need access to the wireless card, you can repeat Steps 1 and 2 to view the Wireless Network Connection icon. Enable the card by Right Clicking and choosing Enable.
Windows 7
  1. Click Start and choose Control Panel. Click the Network and Sharing Center icon.
  2. On the left side, click the Change adapter settings link.
  3. Right Click on the Wireless Network Connection icon.
  4. If you see an Enable choice, the Wi-Fi is already disabled. You're good to go. Close the Network Connections window.

    If you see a Disable choice, select it. This will disable the wireless card. Close the Network Connections window.

    NOTE: When you need access to the wireless card, you can repeat Steps 1 and 2 to view the Wireless Network Connection icon. Enable the card by Right Clicking and choosing Enable.

Monday, October 7, 2013

No network provider accepted the given network path

No network provider accepted the given network path.


I was getting the following error connecting to somlh17 and somlh35 shares.  "No network provider accepted the given network path."   I could connect to the internet and sommail, and I can ping somlh17 and somlh35.  Shutting down and rebooting fixed this issue previously but was not able to this time.  The following fix from MS worked for me.

While you are using a computer that has one of the operating systems that are listed in the "Applies To" section installed, you may experience either of the following symptoms.

  • When you try to connect to a network share, you may receive the following error message:
No network provider accepted the given network path.

  • You may also receive the following error message:
Workstation service terminated with service-specific error 2250


CAUSE

This issue occurs because the Mup.sys file is missing or corrupted.


RESOLUTION

To resolve this problem, follow these steps:

1.     Restart your computer in Safe mode.

2.     Use System File Checker with the /scannow parameter to immediately scan and verify the versions of all the system files that Windows File Protection helps protect. You must be logged on as an administrator or as a member of the Administrators group to run System File Checker. You can run the sfc /scannow command to use System File Checker.

3.     If you get information about the corrupted Mup.sys file, expand the Mup.sys file from the Windows XP CD to the C:\Windows\System32\Drivers folder. For example, if the CD drive is D, type the following at a command prompt:

expand d:\i386\mup.sy_ c:\windows\system32\drivers

4.     Expand the Mup.sys file from the Windows XP CD to the C:\Windows\System32\Dllcache folder. For example, if the CD drive is D, type the following at a command prompt:

expand d:\i386\mup.sy_ c:\windows\system32\dllcache


Note You can also use Expand File in the System Configuration Utility (MSCONFIG). 

For more information, click the following article number to view the article in the Microsoft Knowledge Base:

310560  How to troubleshoot configuration errors by using the System Configuration utility in Windows XP

This fix didn't work this time around. running out of time I reinstalled the NIC drivers from Dell and updated the BIOS from A10 to A15 I think. Reboot after that brought this back.

Posted 08:03, 2 Oct 2009

Monday, October 15, 2012

Dell Printer Queue shows offline

Dell Printer Queue shows offline, printer may have worked previously but out of the blue is "offline" on the print server.  The printer will show offline in print queue but printer display shows Ready, and you can print via IP and everything else looks normal.  The fix is:


DISABLED SNMP Status Enabled under Port Settings on the print queue, on the print server.

Wednesday, March 14, 2012

NetApp Perfstat tool Usage

NetApp Perfstat tool Usage

Perfstat is a NetApp tool that you can monitor and reveal your NetApp Storage devices . You can download it from NetApp web site.

Usage of perfstat is;

perfstat -f IPAddressofNetAPP -t 10 -i 12 > perfstat.out

10 : Get statistics for every 10 minutes;
12 : Number of sample
perfstat.out : Name of the file that log will be saved into.

https://kb.netapp.com/support/index?page=content&id=1010082
http://now.netapp.com/NOW/download/tools/perfstat/

Monday, August 8, 2011

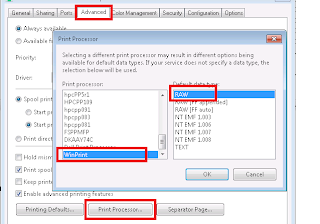
(FIXED) Windows cannot connect to the printer, 0x00000bcb, 0x0000007e, 0x0000000d, hpcpn5r1.dll loading error


Windows cannot connect to the printer. Operation could not be completed (error) then with one of the following error codes.

0x00000bcb
0x0000007e
0x0000000d

Fixes the worked for me.

1. As this was related to adding x64 drivers, just delete the entire printer queue and recreate it with the proper driver. Changing drivers and print processor settings didn't work as I kept getting error messages of hpcpn5r1.dll loading error. I had removed this from the print processor configuration under Advanced settings but it was not until I blew away the queue and recreated with the same settings that the PC clients actually saw the change.

2. IF the print queue works for XP and WIn7 x86 but you get the same error for Win7 x64, then change the Print Processor to WinPrint, RAW.


3. the 0x00000bcb error I got when there was a driver conflict. The system had the HP Universal Print driver installed. When that was removed from the client computer, it had no problem mapping the print queue I just created on my server

Howto: extract files from a .msi file using the Windows command line

Every once in a while I need to extract the content of a .msi file in order to customize a deployment for a particular network environment. Sometimes initializing the .msi installer will temporarily extract the files into C:\Documents and Settings\\Local Settings\Temp, but those files are removed once the installer exits.

To extract files from a .msi file at the command line, type:

msiexec /a PathToMSIFile /qb TARGETDIR=DirectoryToExtractTo

For example, to extract files from f:\zenworks\zfdagent.msi into c:\zfd701 you would type:

msiexec /a f:\zenworks\zfdagent.msi /qb TARGETDIR=c:\zfd701

The destination directory does not need to exist prior to running this command

Tuesday, June 28, 2011

Delete duplicate rows from a list in Excel

Delete duplicate rows from a list in Excel

A duplicate row (also called a record) in a list is one where all values in the row are an exact match of all the values in another row. To delete duplicate rows, you filter a list for unique rows, delete the original list, and then replace it with the filtered list. The original list must have column headers.

Because you are permanently deleting data, it's a good idea to copy the original list to another worksheet or workbook before using the following procedure.

  1. Select all the rows, including the column headers, in the list you want to filter.

Tip

Click the top left cell of the range, and then drag to the bottom right cell.

  1. On the Data menu, point to Filter, and then click Advanced Filter.
  2. In the Advanced Filter dialog box, click Filter the list, in place.
  3. Select the Unique records only check box, and then click OK.

The filtered list is displayed and the duplicate rows are hidden.

  1. On the Edit menu, click Office Clipboard.

The Clipboard task pane is displayed.

  1. Make sure the filtered list is still selected, and then click Copy Copy button.

The filtered list is highlighted with bounding outlines and the selection appears as an item at the top of the Clipboard.

  1. On the Data menu, point to Filter, and then click Show All.

The original list is re-displayed.

  1. Press the DELETE key.

The original list is deleted.

  1. In the Clipboard, click on the filtered list item.

The filtered list appears in the same location as the original list.

Thursday, May 19, 2011

Windows 7 explorer does not refresh file contents

Windows 7 explorer does not refresh file contents

After copying or deleting files the content is not displayed, sure its a windows issue but for my sanity to get around this just hit F5 to do a real refresh. Apparently the refresh button in the browser does nothing to help this.

ADUC installer for Window7

ADUC installer for Window7, worked great on my 32bit VM.

Thursday, February 17, 2011

Write up to replace 4.5 View Client installers.

The latest windows updates broke some 4.5 clients, here is a great write up on how to replace the download files on your View Connection server.

Wednesday, February 16, 2011

MS KB Article on how to use EFS Recovery Key

MS KB Article on how to use EFS Recovery Key to retrieve encrypted files from a user who has lost their EFS key for whatever reason.

Tuesday, February 15, 2011

Outlook 2010 errors on auto creating user profile

I got this error because my mailbox is located on an Exchange 2003 mailbox server.
  • Install the August 31, 2010 hotfix package for Outlook 2010

You can download this hotfix package from the following article in the Microsoft Knowledge Base:

2281463 Description of the Outlook 2010 hotfix package (outlook-x-none.msp): August 31, 2010
http://support.microsoft.com/default.aspx?scid=kb;en-US;2281463


Monday, February 14, 2011

Blacklisted Email Domain

Apparently our work gets blacklisted every now and then due to compromised accounts.

Useful websites to check if you are currently BlackListed (you'll need to know you gateway email IP address):


Comcast's Online request form to be removed.

We haven't had the same luck with Microsoft's MSN / Hotmail domains on getting removed easily.


Thursday, February 10, 2011

How to create a Windows 7 Default Profile

I need to create a Windows 7 Default Profile, apparently I heard the old fashioned way from XP doesn't work anymore. I cam across this document online and I'm going to give it a shot. Hopefully it works as advertised!

Friday, January 28, 2011

You cannot make more than one client connection over a NAT device

You cannot make more than one client connection over a NAT device


When two client computers try to use the server message block (SMB) protocol to connect to the same server across a network address translation (NAT) device, the more recent client connection may reset the earlier client connection. If a client and a server that use the SMB protocol over a NAT device are copying files, that session may be reset when another client uses the SMB protocol over the same NAT device to the same server.

Tuesday, January 25, 2011

How to install and use Dell OMSA

http://www.thegeekstuff.com/2008/11/how-to-manage-dell-servers-using-omsa-openmanage-server-administrator-on-linux/

1. Download DELL OMSA

Go to DELL support website -> click on “Drivers & Downloads” -> choose your server model (in my case, I selected PowerEdge 2850) -> choose the operating system -> scroll-down and expand ‘Systems Management’ -> Click on ‘OpenManage Server Administrator Managed Node’ -> Click on OM_5.5.0_ManNode_A00.tar.gz to download it. You can directly download it to your Linux server as shown below.

# mkdir -p /usr/local/omsa # cd /usr/local/omsa # wget http://ftp.us.dell.com/sysman/OM_5.5.0_ManNode_A00.tar.gz

2. Install DELL OMSA

Perform an express OMSA installation as shown below. After the installation, check /var/log/srvadmin.log for any installation errors.

# gzip -d OM_5.5.0_ManNode_A00.tar.gz # tar xvf OM_5.5.0_ManNode_A00.tar # sh linux/supportscripts/srvadmin-install.sh --express Installing the selected packages.  Preparing...                ###################################### [100%]    1:srvadmin-omilcore      ###################################### [  8%]      To start all installed services without a reboot,      enter the following command:  srvadmin-services.sh  start    2:srvadmin-syscheck      ###################################### [ 15%]    3:srvadmin-deng          ###################################### [ 23%]    4:srvadmin-omauth        ###################################### [ 31%]    5:srvadmin-omacore       ###################################### [ 38%]    6:srvadmin-jre           ###################################### [ 46%]    7:srvadmin-ipmi          ###################################### [ 54%]    8:srvadmin-hapi          ###################################### [ 62%]    9:srvadmin-isvc          ###################################### [ 69%]   10:srvadmin-cm            ###################################### [ 77%]   11:srvadmin-iws           ###################################### [ 85%]   12:srvadmin-omhip         ###################################### [ 92%]   13:srvadmin-storage       ###################################### [100%]

3. Start DELL OMSA Services

Invoke the srvadmin-services.sh script to start the OMSA services as shown below.

# sh linux/supportscripts/srvadmin-services.sh start Starting Systems Management Device Drivers: Starting dell_rbu:                                         [  OK  ] Starting ipmi driver:                                      [  OK  ] Starting Systems Management Data Engine: Starting dsm_sa_datamgr32d:                                [  OK  ] Starting dsm_sa_eventmgr32d:                               [  OK  ] Starting DSM SA Shared Services:                           [  OK  ] Starting DSM SA Connection Service:                        [  OK  ]

4. Access OMSA from web browser

By default, OMSA web application runs on Port 1311 . Login to OMSA from web using the URL: https://{omsa-server-ip-address}:1311 using root as shown below. Please note that you can login only using HTTPS.

DELL OMSA Login Screen
Fig: DELL OMSA – Web Login Screen

5. Check overall system health of the server

To check the overall system health of various hardware components, expand system menu and click on ‘Main System Chassis’, which will display the health of Memory, CPU etc., as shown below.

DELL OMSA Check System Health
Fig: DELL OMSA – Check System Health

6. Clear System Event Log on DELL PowerEdge Servers

Sometimes you will see hardware error messages on the front side of the server even after the problem is fixed. To clear this false alarm, you have to clear the hardware’s Embedded System Management (ESM) Log. To clear hardware event logs, login to DELL OMSA -> Click on Logs TAB -> click on Clear Log.

7. Create RAID (Virtual Disk) group using OMSA

To create a new raid group, click on Storage -> select “Create Virtual Disk” from the drop-down menu next to “PERC 4e/Di”, as shown below. -> Click on Execute -> and follow the on-screen instructions to create a new RAID group.

DELL OMSA Create RAID
Fig: DELL OMSA – Create RAID


You can also create RAID using PERC/CERC Bios Configuration Utility as explained in Step-by-Step Guide to Configure Hardware RAID on DELL servers with Screenshots.

Once the RAID group is created, to view the RAID, click on Storage -> “PERC 4e/Di (Embedded)” -> Click on “Virtual Disks” -> Click on “Virtual Disks 0″ -> This will display the details of the physical disks of that particular RAID group as shown below.

DELL OMSA View RAID
Fig: DELL OMSA – View RAID

Monday, January 24, 2011

Telnet client missing in Windows 2008 Server?

So, how do you install Telnet in Windows 2008 Server? Either use the “Initial Configuration Tasks” screen or open Server Manager by going to Start -> Administrative Tools -> Server Manager. From there, click on Add a Feature. You want to add the Telnet Client. This will get your CLI telnet application working again.

Tuesday, January 18, 2011

Export Computer objects from Active Directory with OldCmp

Export Computer objects from Active Directory with OldCmp

I needed to reconcile Active Directory computer objects last login time with a complete list of my company's inventory and found this process to be pretty useful. Please visit http://www.joeware.net/freetools/tools/oldcmp/index.htm to download OldCmp, this utility will export computer objects from AD. I'm paranoid so I used a AD account with no rights to delete or modify objects but just enough rights to read AD, which is just about any account.

  1. Download OldCmp.zip from http://www.joeware.net/freetools/tools/oldcmp/index.htm
  2. Extract the OldCmp.exe file within the zip and place in a directory you can easily navigate to from within the cmd line interface.
  3. Review the OldCmp.exe usage switches on this page: http://www.joeware.net/freetools/tools/oldcmp/usage.htm or with the OldCmp /? command
  4. For the report I needed, I ran the following command:
    C:\Documents and Settings\testr>oldcmp -report -b ou=hosting,dc=subdomain,dc=domain,dc=edu -file oldcmp_export.csv -format CSV
  5. This generated a file called oldcmp_export.csv of all the systems in my domain within the "hosting OU with their last system login time if available.
Note: This tool is VERY POWERFUL and could be VERY DANGEROUS! If you are not sure what you are doing, please find or ask someone who does!

Next, I needed to import this file into Excel and clean up the formatting and run a comparison with MS Access. I did the following:

  1. Rename the csv file you just exported to have a .txt extension (this is done so that Excel will be prompted for delimiters when it tries to open/import its data).
  2. Launch Excel and open the csv file (now renamed as a txt file), select the delimiter as semicolon and then correct formatting and clean up anything that looks strange. I can't tell you how to do this as your naming conventions may collide with the delimiters set. Use your own judgement and save-as a new excel file, you will reference this file from MS Access.
  3. Launch MS Access, create a new DB.
  4. See http://office.microsoft.com/en-us/access-help/compare-two-tables-and-find-only-matching-data-HA010205130.aspx for a how to on how to create the comparison in MS Access 2007.

Monday, October 11, 2010

inSSIDer 2

inSSIDer 2


Nice blurb for inSSIDer to help with WiFi issues.

inSSIDer is FREE, open-source Wi-Fi scanning software. And yet you want to know more. Wow. you truly are our type of geek. Take a look at the features below to see what makes inSSIDer special.

What's Unique about inSSIDer?

  • Compatible with Windows XP, Vista and 7 (32 and 64-bit)
  • Uses the Native Wi-Fi API and your current Wireless network card
  • Sort results by Mac Address, SSID, Channel, RSSI and "Time Last Seen"
  • Compatible with most GPS devices (NMEA v2.3 and higher)

How can inSSIDer help me?

  • Inspect your WLAN and surrounding networks to troubleshoot competing access points
  • Track the strength of received signal in dBm over time
  • Filter access points in an easy-to-use format
  • Highlight access points for areas with high Wi-Fi concentration
  • Export Wi-Fi and GPS data to a KML file to view in Google Earth.
  • Filter through hundreds of scanned access points

Wednesday, April 14, 2010

Fix for "The message store has reached its maximum size" message in Outlook

Fix for "The message store has reached its maximum size" in Outlook

Got this for one user and all mailbox size was within limits and quotas. Issues was a bad .OST file.

It was a corrupt .OST file. Close outlook, rename the .OST file in C:\Documents and Settings\username\Local Settings\Application Data\Microsoft\outlook and then re-open outlook. It will re-create the OST file for them.