Wednesday, November 11, 2009

Synergy KVM - Share 1 set up mouse and keyboards across more machines

Came across this a while back but just waster 2 hours trying to set it up again since its been years.  I think the only shortfall to this, is its not secure.  But I use this in closed NAT networks at home so I feel somewhat safe about using it.

WinXP

I downloaded the exe for Windows here http://sourceforge.net/projects/synergy2/files/ this is really straight forward so I won't write much about this.

Mac OSX

I wasted one hour trying to figure out the command line in OSX to setup Synergy and just could not get it to work, I then downloaded the file called "SynergyKM-1.0b7-Installer.dmg" at the time of this post from this link here http://sourceforge.net/projects/synergykm/files/
See notes here to setup the Mac client you downloaded above http://lifehacker.com/photogallery/set-up-synergy-on-mac/

Ubuntu

I went under System->Administrations->Synaptic Package Manager and searched for Synergy and installed the 2 packages.  This was all I needed to do.

This is all I have time to write notes on today, this is by no means a "How To" but just a reminder for myself to download the KM version for Mac in the future.

Tuesday, October 27, 2009

How to export list of user that are part of a AD Security Group

Every once and a while you come across these little annoying obstacles when working with Active Directory that should be easy to solve but requires some special tools, for example that there is no way to export all the members of a group in the Active Directory Users & Computers GUI tool. Using advanced search filter for a user with the “Member of” filter doesn’t seem to work so one way to do it is with “dsquery” and “dsget”, tools for Windows 2003 that you can find using Google probably. Here is how to list all members of a specific AD group.

List all members in the group "MY_GROUP_NAME" and exports to a file at the following location "C:\Documents and Settings\yourlogin\Desktop\export.txt"

C:\Program Files\Support Tools>dsquery group -name "MY_GROUP_NAME" | DSGET group -members > "C:\Documents and Settings\yourlogin\Desktop\export.txt"

Tuesday, October 20, 2009

FIX: Xerox WorkCentre is offline on a Windows 2003 Server

Symptomes: Some network printers published by a Windows 2003 SP2 server will be marked as "offline" and cease to be available. Restarting the spooler will make the printers briefly available (for 30 seconds or so) before they reset to offline status.

Problem: MS has changed the way SNMP-enabled printer are handeled in SP2. I don't have the full detail, but apparently any printer that is marked as SNMP enabled (by the driver, I assume) will REQUIRE (by default) SNMP to be setup correctly and working on both the printer and local server (community names). Never mind if these printer all have SNMP actually disabled.

Solution: On the properties of each printer (on the server), select the "port" tab, local the correct port, click on "configure" and uncheck "SNMP enabled". Once you click "ok" the printer's status will be instantly turned back to normal.

Tuesday, October 6, 2009

How to Make a 4 Partition, Dual Booting External HDD w/ BartPE & Mac OSX

How to Make a 4 Partition, Dual Booting External HDD w/ BartPE & Mac OSX

1. Create 4 NTFS partitions from a WinXP box using Disk Management, the partition that will be used for booting BartPE can be fairly small (4GB).
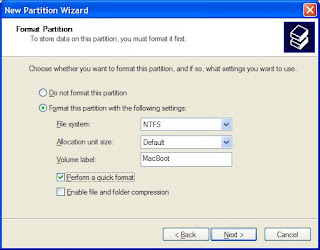

2. Make an extended partition for Mac storage, then change the extended partition into logical drive.
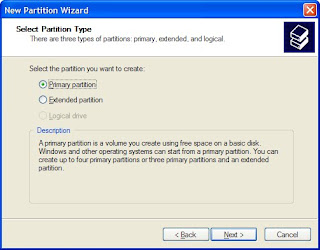
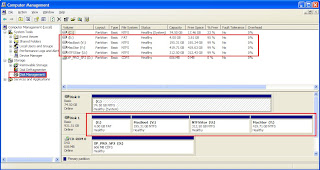
3. Next dismount the drive from the WinXP box and connect/mount to a 10.5 Mac system via FW or USB. Open Disk Utility on the Mac and format the 2 designated for Mac use partitions you had previously create in NTFS format from the WinXP system. You can do this from the Mac OSX by ERASING in Disk Utility to Mac Journaled format.
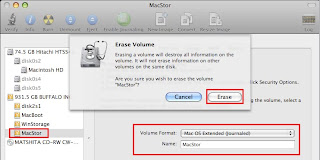

4. The system will now have 2 Windows formatted drives and 2 Mac formatted drives.

5. You can now restore an image to one of the Mac partitions to be used as a boot drive, the other Mac formatted partition is for file storage as a Mac OS can NOT write to NTFS partitions. Eject the drive from the Mac when done imaging.

6. Bring the system back to a PC and plugin the Buffalo drive in along with a bootable BartPE USB thumb flash drive. Boot this system to a BartPE CD-ROM and launch Ghost. Perform a Partition to Partition image process. You will be copying the PARTITION from the bootable USB boot BartPE drive (identify the partition by its SIZE) to the PARTITION on the Buffalo designated for Windows booting.
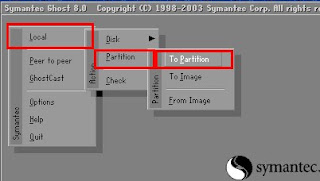

Notes:
• Make sure the 4GB BartPE boot partition is set to ACTIVE, or the drive cannot be booted from.
• I had issues creating a NTFS partition and then formatting/erasing from the Mac when the partition size was greater than 500GB. I ended up scaling down the partition size to around 400GB and that worked. I’m not sure what the issue was when the partition was larger than 500GB. The Mac gave some weird error message and also could not repair the partition. I failed to note the exact error message.

Friday, June 19, 2009

Restore files from a damaged hard drive using ZAR

Restore files from a damaged hard drive using ZAR

Came across this app at TR, haven't used it yet but thought it could come in handy one day.

http://blogs.techrepublic.com.com/window-on-windows/?p=940&tag=nl.e103

Zero Assumption Recovery (ZAR, for short) is a shareware-based utility that can scan your hard drive for files, even if it has been reformatted or is damaged. Using a fairly simple wizard-based user interface, ZAR will walk you through the steps to recover important data from an otherwise inaccessible hard drive.

The download comes as the free trial shareware version with some important limitations. Per wizard cycle, you are allowed to select files in only four folders. While this may seem okay, be warned that if your My Documents folder is arranged like:

  • My Documents
  • Home
  • My Pictures
  • My Videos
  • School
  • Work

You will be unable to choose just the My Documents folder and get all those subfolders and their files. You will instead have to make multiple passes with ZAR in trial mode to get all your files restored.

The other option is to pay for a license key. Currently, ZAR costs $49.95 for a single-user instance, which, depending on the importance of the data you are going to lose, may just be worth it. The alternative is seeking out a computer repair shop to do the work, which might more than double that cost.

Wednesday, April 15, 2009

The Most Accurate PDF-to-Word Converter

The Most Accurate PDF-to-Word Converter

Using our PDF-to-Word conversion technology, you can quickly and easily create editable DOC/RTF files, making it a cinch to re-use PDF content in applications like Microsoft Word, Excel, OpenOffice, and WordPerfect.
Best of all, it's entirely free!

http://www.pdftoword.com

I tested this out with a PDF manual I had lying around on my desktop and it seemed to do a pretty good job, for FREE too!

Friday, February 27, 2009

Imaging a new Dell Latitude E6400

Below is my tiny little check list to Imaging a new Dell Latitude E6400 using GHOST.

Boot E6400
Enter BIOS Setep
-Go to System Configuration
--SATA Operation
---Switch from IRRT to ATA
Apply Settings and Exit

System restarts, hit F12 at boot menu
Boot to USB BartPE disc
Image the system with GHOST

When imaging completes, restart system
Enter BIOS Setep
-Go to System COnfiguration
--SATA OPeration
---Switch from ATA to IRRT
Apply Settings and Exit


Reboot and you should be done, my last step was to run the MS NewSID executable upon first boot up to rename the system and run a new random SID.