Tuesday, October 27, 2009

How to export list of user that are part of a AD Security Group

Every once and a while you come across these little annoying obstacles when working with Active Directory that should be easy to solve but requires some special tools, for example that there is no way to export all the members of a group in the Active Directory Users & Computers GUI tool. Using advanced search filter for a user with the “Member of” filter doesn’t seem to work so one way to do it is with “dsquery” and “dsget”, tools for Windows 2003 that you can find using Google probably. Here is how to list all members of a specific AD group.

List all members in the group "MY_GROUP_NAME" and exports to a file at the following location "C:\Documents and Settings\yourlogin\Desktop\export.txt"

C:\Program Files\Support Tools>dsquery group -name "MY_GROUP_NAME" | DSGET group -members > "C:\Documents and Settings\yourlogin\Desktop\export.txt"

Tuesday, October 20, 2009

FIX: Xerox WorkCentre is offline on a Windows 2003 Server

Symptomes: Some network printers published by a Windows 2003 SP2 server will be marked as "offline" and cease to be available. Restarting the spooler will make the printers briefly available (for 30 seconds or so) before they reset to offline status.

Problem: MS has changed the way SNMP-enabled printer are handeled in SP2. I don't have the full detail, but apparently any printer that is marked as SNMP enabled (by the driver, I assume) will REQUIRE (by default) SNMP to be setup correctly and working on both the printer and local server (community names). Never mind if these printer all have SNMP actually disabled.

Solution: On the properties of each printer (on the server), select the "port" tab, local the correct port, click on "configure" and uncheck "SNMP enabled". Once you click "ok" the printer's status will be instantly turned back to normal.

Tuesday, October 6, 2009

How to Make a 4 Partition, Dual Booting External HDD w/ BartPE & Mac OSX

How to Make a 4 Partition, Dual Booting External HDD w/ BartPE & Mac OSX

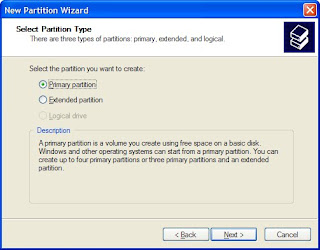
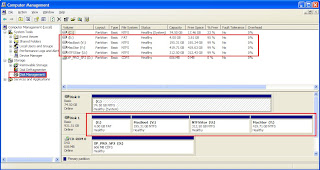
1. Create 4 NTFS partitions from a WinXP box using Disk Management, the partition that will be used for booting BartPE can be fairly small (4GB).


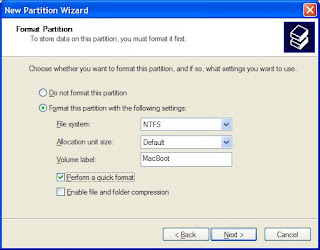
2. Make an extended partition for Mac storage, then change the extended partition into logical drive.


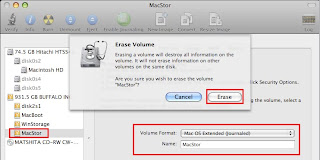
3. Next dismount the drive from the WinXP box and connect/mount to a 10.5 Mac system via FW or USB. Open Disk Utility on the Mac and format the 2 designated for Mac use partitions you had previously create in NTFS format from the WinXP system. You can do this from the Mac OSX by ERASING in Disk Utility to Mac Journaled format.


4. The system will now have 2 Windows formatted drives and 2 Mac formatted drives.

5. You can now restore an image to one of the Mac partitions to be used as a boot drive, the other Mac formatted partition is for file storage as a Mac OS can NOT write to NTFS partitions. Eject the drive from the Mac when done imaging.

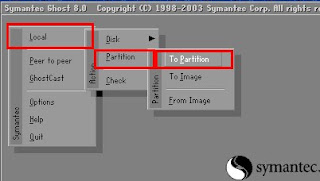
6. Bring the system back to a PC and plugin the Buffalo drive in along with a bootable BartPE USB thumb flash drive. Boot this system to a BartPE CD-ROM and launch Ghost. Perform a Partition to Partition image process. You will be copying the PARTITION from the bootable USB boot BartPE drive (identify the partition by its SIZE) to the PARTITION on the Buffalo designated for Windows booting.


Notes:
• Make sure the 4GB BartPE boot partition is set to ACTIVE, or the drive cannot be booted from.
• I had issues creating a NTFS partition and then formatting/erasing from the Mac when the partition size was greater than 500GB. I ended up scaling down the partition size to around 400GB and that worked. I’m not sure what the issue was when the partition was larger than 500GB. The Mac gave some weird error message and also could not repair the partition. I failed to note the exact error message.